windows တင္ဖုိ႔အတြက္ ဘာေတြလုိတယ္ဆုိတာေတာ့ အေသးစိတ္မေျပာေတာ့ပါဘူး။ အားလုံးသိျပီးသား ျဖစ္မွာပါ..။windows 8 DVD တခ်က္ ဒါမွမဟုတ္ windows8 သြင္းထားတဲ့ USB တခုခု ရွိရင္ ရပါျပီ..။ ကြန္ပ်ဴတာကုိ CDROM ထဲကုိ windows 8 DVD ထည့္ျပီး Restart ခ်လုိက္ပါ..။(usb နဲ႔ဆုိရင္လည္း အတူတူပါပဲ)
ျပီရင္ Boot ေရြးဖုိ႔အတြက္ ကီးတခုကုိ ႏွိပ္ထားပါ..။ကြန္ပ်ဴတာ အမ်ိဳးအစားအလုိက္ ကီးကကြဲျပားပါတယ္..။
hp မွာဆုိရင္ေတာ့ F9 ၊ Acer မွာေတာ့ F12 ၊အျခားအမ်ိဳးအစားလုိက္ ကြဲျပားပါတယ္..။ ေအာက္မွာ ဓါတ္ပုံေတြနဲ႔ အေသးစိတ္ တင္ျပထားပါတယ္..။
အခုလုိ boot option menu ေပၚလာျပီဆုိရင္ CD/DVD ROM Drive ကုိေရြးေပးလုိက္ပါ..။
ၾကိဳက္တဲ့ ကီးတခုကုိ တခ်က္ႏွိပ္ေပးလုိက္ပါ..က်ေနာ္ကေတာ့ enter ကုိႏွိပ္ပါတယ္..။
ဒီလုိေပၚလာရင္ ခဏေစာင့္ေနလုိက္ပါ..။windows8 ကုိ install လုပ္ဖုိ႔ အဆင္သင့္ျဖစ္ေနပါျပီ..။
language မွာ english ကုိ ေရြးျပီး Next ကုိ click လုိက္ပါ..။
install now ကုိ click လုိက္ပါ..။
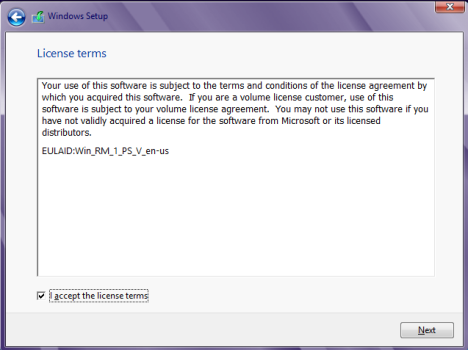
accept the license terms မွာ အမွန္ျခစ္ေပးျပီး Next ကုိ click လုိက္ပါ..။
Custom ကုိေရြးေပးလုိက္ပါ...။
ဒါက partition ခြဲဖုိ႔ drive ကုိ fomat ခ်ဖုိ႔ အဆင့္ပါ..။drive option ကုိ ေရြးျပီး Next ကုိ click ပါ..။
partition ခြဲမယ္ဆုိရင္ New ကုိ ေရြးျပီး Next ကုိ click ပါ..။
size မွာ ကုိလုိခ်င္သေလာက္ကုိ ထည့္ျပီး Apply ေရြးျပီး Next ကုိ click ပါ..။
ok ပဲ လုပ္လုိက္ပါ..။
partition ခြဲထားတာ ျမင္ရပါျပီ..။ ကုိယ္ install လုပ္ခ်င္တဲ့ အပုိင္းကုိ ေရြးျပီး Next ကုိ click ပါ..။
အခုဆုိရင္ windows8 ကုိ စတင္ install လုပ္ေနပါျပီ..။အနည္းငယ္ ၾကာပါတယ္..။
ေစာင့္ေနယုံပါပဲ..။
windows8 ကုိ installလုပ္တဲ့ အဆင့္ ျပီးသြားပါျပီ..။
ကုိယ္ၾကိဳက္တဲ့ ေနာက္ခံအေရာင္နဲ႔ PC name ကုိ ထည့္ျပီး Next ကုိ click ပါ..။
customize ကုိေရြးေပးလုိက္ပါ..။
က်ေနာ္ကေတာ့ No.don't turn ကုိေရြးပါတယ္..။
Next ပဲလုပ္ေပးလုိက္ပါ..။
ဒီအဆင့္မွာလည္း Nextကုိပဲ ေပးလုိက္ပါ..။ေနာက္မွ setting ေတြျပင္လုိ႔ျဖစ္ပါတယ္..။
Next ပဲလုပ္ေပးလုိက္ပါ..။
ကုိယ့္ရဲ႔ email. လိပ္စာထည့္ျပီး Next ပဲလုပ္ေပးလုိက္ပါ..။
ကုိယ့္ရဲ႔ email.နဲ႔ password ကုိထည့္ေပးလုိက္ပါ..။
နုိင္ငံ ေရြးျပီး ဖုန္းနံပါတ္ထည့္ရပါမယ္.ျပီးရင္ email. ကုိထည့္ျပီ Next ကုိ click ပါ.။
windows 8 finalizing ျဖစ္ေၾကာင္းျပတာပါ..။
windows8 ကုိ မိတ္ဆက္ျပေနတာပါ..။
windows 8 မွာ ပါ၀င္တဲ့ apps ကုိ installing လုပ္ေနတာမုိ႔ ခဏေစာင့္ရပါမယ္..။
အခုဆုိရင္ windows 8 ထည့္သြင္းျခင္း ေအာင္ျမင္ျပီးဆုံးသြားပါျပီ..။
windows 8 ကုိစတင္အသုံးျပဳနုိင္ပါျပီ..။
အာလံုးပဲဆင္ေျပပါေစလုိ ့ေမွ််ာ္လင့္ပါတယ္
က်ေနာ္တင္တဲ့ Post ေတြကို
မန္ဘာဝင္ဖုိ ့ဖိတ္ေခၚပါတယ္
ဆက္ဖတ္ရန္